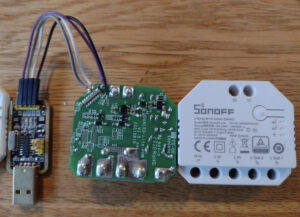
Hvordan jeg installerer Tasmota på Sonoff Dual R3 Lite, der fås for omkring 100kr på f.ex. Amazon.de
Se også
- Mit indlæg: Smart Wifi Switch – Tasmota på Sonoff Basic
- GitHub: arendst/Tasmota
- Tasmota.GitHub.io: Sonoff-Dual
- templates.blakadder.com: sonoff_DUALR3L
Tasmota firmware installeres på Dimsen via RS232, Dimsen skal bootes i programming mode, tryk-på-knap mens USB kabel sættes i computer (gpio-0 til GND). Derefter udfører jeg disse komandoer
- Check forbindelse og cpu type:
$ esptool.py -p /dev/ttyUSB0 read_mac
esptool.py v4.8.1
Serial port /dev/ttyUSB0
Connecting.....
Detecting chip type... Unsupported detection protocol, switching and trying again...
Connecting...
Detecting chip type... ESP32
Chip is ESP32-D0WD-V3 (revision v3.1)
Features: WiFi, BT, Dual Core, 240MHz, VRef calibration in efuse, Coding Scheme None
Crystal is 40MHz
MAC: a8:42:e3:9c:80:c4
Uploading stub...
Running stub...
Stub running...
MAC: a8:42:e3:9c:80:c4
Hard resetting via RTS pin...
- Check flash størrelse:
$ esptool.py -p /dev/ttyUSB0 flash_id
esptool.py v4.8.1
Serial port /dev/ttyUSB0
Connecting...
Detecting chip type... Unsupported detection protocol, switching and trying again...
Connecting...
Detecting chip type... ESP32
Chip is ESP32-D0WD-V3 (revision v3.1)
Features: WiFi, BT, Dual Core, 240MHz, VRef calibration in efuse, Coding Scheme None
Crystal is 40MHz
MAC: a8:42:e3:9c:80:c4
Stub is already running. No upload is necessary.
Manufacturer: c8
Device: 4016
Detected flash size: 4MB
Flash voltage set by a strapping pin to 3.3V
Hard resetting via RTS pin...
- Backup af den firmware der er installeret nu:
$ esptool.py --port /dev/ttyUSB0 read_flash 0x00000 0x100000 sonoff-dualr3l-orig.bin
- Download Tasmota firmware:
$ wget https://ota.tasmota.com/tasmota32/tasmota32.factory.bin
- Slet nuværende firmware:
$ esptool.py --port /dev/ttyUSB0 erase_flash
- Upload den nye firmware:
$ esptool.py --port /dev/ttyUSB0 --chip esp32 --baud 921600 --before default_reset --after hard_reset write_flash -z --flash_mode dout --flash_freq 40m --flash_size detect 0x00000 tasmota32.factory.bin
Det var det, nu kører Dimsen Tasmota, Det ville have være rart om vi kunne konfigurere Wifi og Mqtt, nu vi alligevel har rs232 adgang, men ifølge
er der ikke strøm nok, så resten af opsætningen må foregå med enheden forbundet til 220v via WiFi og WEB-browser.
- fjern testledninger vi loddede på
- koble enheden op til lysnettet
- på telefon/comnputer forbind til Wifi Accesspoint “tasmota-9C80C4-0196“
- Configuration -> Configure Wifi: Sæt SSID, Password og hostname
- Configuration -> Configure Other: Sæt Template:
{"NAME":"Sonoff Dual R3 Lite","GPIO":[32,0,0,0,0,0,0,0,0,576,225,0,0,0,0,0,0,0,0,0,0,0,0,224,0,0,0,0,160,161,0,0,0,0,0,0],"FLAG":0,"BASE":1}Activate, Save
- Configuration -> Configure MQTT: Sæt Host 192.169.x.y, Topic sw_dualr3l-1
- power cycle enheden
Nu burde dimsen optræde på nettet som:
- http://sw-dualr3l-1
Det var det hele


You must be logged in to post a comment.